text of this document (ocr, may contain errors)
Page 1
y
(GET! Saab 90, 99, 900, 9000
Aw OIL PRESSURE GAUGE
MANOMETRE DE PRESSION D’HUILE
VA =
Y OLMANOMETER
OLJETRYCKMATARE
Art no. 214 160004, 214 164.006
FITTING INSTRUCTIONS - INSTRUKTIONS DE MONTAGE « MONTAGEANLEITUNG - MONTERINGSANVISNING
FI
g
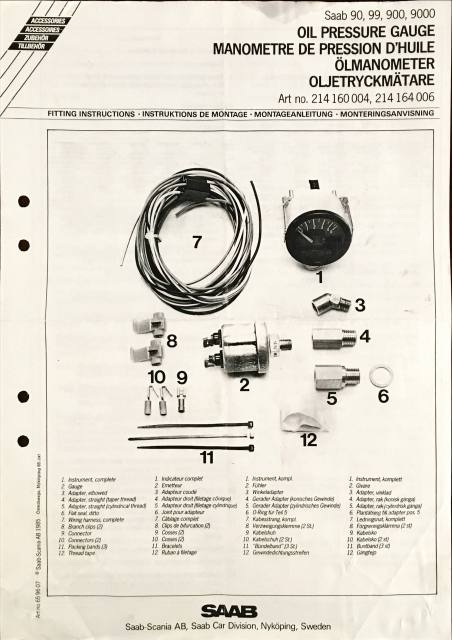
2 1. Instrument, complete 1. Indicateur complet 1. Instrument, kompl. 1, Instrument, komplett
z 2 Gauge 2. Emetteur 2. Fuhler 2 Giare
6 3. Adapter, elbowed 3. Adapteur coudé 3. Winkeladapter 3. Adapter, vinklad
3 4. Adapter, straight (taper thread) 4. Adapteur droit (filetage conique) 4. Gerader Adapter (konisches Gewinde) 4. Adapter, rak (konisk ganga)
é 5, Adapter, straight (cylindrical thread) 5. Adapteur droit (filetage cylindrique) 5. Gerader Adapter (zylindrisches Gewinde) 5. Adapter, rak (cylindrisk ganga)
re) 6. Flat seal, ditto 6. Joint pour adapteur 6. O-Ring fur Teil 5 6. Plantatning till adapter pos. 5
Pa 7. Winng harness, complete 7. Cablage complet 7. Kabesstrang, kompl. 7. Ledningsnat, komplett
a 8 Branch clips (2) 8. Clips de bifurcation (2) 8 Verzweigungsklemme (2 St) & Forgreningsklamma (2 st)
[ee] 9 Connector 9 Cosses (2) 9. Kabelshuh 9. Kabelsko
= 10. Connectors (2) 10. Cosses (2) 10. Kabelschuh (2 St) 10. Kabelsko (2 st)
§ 11. Packing bands (3) 11. Bracelets 11. "Bundelband" (3 St) 11. Buntband (3 st)
a 12. Thread tape 12. Ruban a filetage 12. Gewindedichtungsstreifen 12. Gangtejp
2
3
a
e
~
o
»
a
ra)
ire]
°
4
: SAAB
<
Saab-Scania AB, Saab Car Division, Nyképing, Sweden
Page 2
ENGLISH
1 Remove the chassis cable from the battery.
2. Unpack the kit.
3. Lead the wiring harness from the place chosen for the
instrument to the fuse/relay box.
4. Connection
Use the automatic couplings and connectors provided
with the kit.
Wire -9099M79—-900M7943—SOOMBA. «GOOD MES «9000 MBE.
Colour
ak Gattermeat — Exthierneat — Garthiemwal Earthtermeal Earthen
ehselreay = haelrelay = hme/reay = mha/elay—uteeiny
te ton an bo toe
Wee fuse Fuse 16 Fse 12 Foe 19, Fuse 10
(elon) (Welow/wtte) —(Yelow/whte) —_(Yetow) (etowt
Sows Fie? Fuse 13° Fuse 18° Fuse 30 \ratrament
wee Greeny (Geer (Greeny (Green| pone cra
[Browe/wrte)
“On cars for the USA the brown/white wire is connected to
the green wire leading to the light switch for the passenger
compartment fan switch.
“*The rheostat for the instrument panel lamp in Saab
9000 M86- can take a max additional load of 5 W.
The oil pressure gauge lamp uses 1.2 W.
5. Lead the long red wire to the ordinary oil pressure
contact beside the oil filter.
6. Unscrew and remove the oil pressure contact.
7a. Only Saab 99 M79-81
Screw the angeled adapter in place, use thread tape.
7b. Only H engines (90, 99 M82-, 900 M81-, 9000)
IMPORTANT! Check carefully to see what type of oil
pressure contact is fitted.
Type 1: Conical thread (1/4"-18 NPTF): use the thin
adapter.
Type 2: Cylindrical thread (M14 x 1.5) witha flat
seal: use the thick adapter.
Screw the adapter in place and use:
Thread tape for the conical adapter.
A flat seal for the cylindrical adapter.
8. Screw the oil pressure indicator in place using thread
tape.
9. Cut the red wire and connect it with a flat pin to "G” on
the indicator.
Fasten the wire with tie straps.
10. Connect the blue wire, which was previously connected
to the ordinary oil pressure contact, to "WK" on the
indicator.
11. Connect the 3-pole contact piece to the instrument and
the two connectors to the lamp base.
12. Put the instrument in place.
13. Reconnect the cable chassis to the battery.
14. Check that the oil pressure gauge works and that there
is no oil leakage near the indicator.
FRANCAIS
1. Détacher la masse sur la batterie.
.. Déballer le jeu d'accessoires.
3. Poser le faisceau électrique entre le point d'implanta-
tion prévu pour I'instrument et le coffret électrique de
la voiture.
4. Raccordement
Utiliser les raccordements rapides et les cosses com-
pris dans le jeu.
nN
Ee)
Coteur 90/99 M79. 900 mad.
uf
Nor Bomedeterre Bome de terre ome de tere ome de terre Borne de terre
danslecofret —darsle coffret danse coftet —danslecoftret dans le coftret
Banc Fustie’S Fntle 16 Futile 12 Fuse 10 Fuse 10
i) aune/Bianc) — Unune/Blanc) —Uaune} aure!
Suv Funbie2 Fusble 13 Fuse 18 Fustole 30 ‘neostat
(Brun/Bianc)
** Le rhéostat pour I’éclairage des instruments de la
Saab 9000 M86- admet une surcharge de maxi 5 W.
La lampe du manométre de pression d’huile con-
somme 1,2 W.
5. Poser le grand fil rouge et I'amener jusqu’au contact
ordinaire de la pression d’huile sur le filtre a huile.
6. Dévisser le contact de la pression d’huile.
7a. Pour les Saab 99 M79-81
Visser ladaptateur coudé. Utiliser un cordon d’étan-
cheéité.
7>. Moteur H seulement (90, 99 M82-, 900 M81.,
9000)
IMPORTANT: Contrdler avec soin le type de contact
de pression d’huile se trouvant effectivement en
place.
Type 1: Filet conique (1/4”-18 NPTF) — Utiliser
l'adaptateur mince.
Type 2: Filet cylindrique (M14 x 1,5) avec joint plat
—Utiliser le gros adaptateur.
Visser en place l'adaptateur et utiliser :
Un cordon d’étanchéité pour l'adaptateur conique.
Joint plat pour |'adaptateur cylindrique.
8. Utiliser un cordon d'étanchéité et visser le capteur de
pression d’huile.
9. Couper le fil rouge et le raccorder avec une broche
plate sur l'orifice "G” sur le capteur.
Attacher le fil avec de la bande a ligature.
10. Raccorder le fil bleu qui, précédemment était solidaire
du contact ordinaire de la pression d'huile sur le repere
“WK” du capteur.
11. Raccorder le boitier de connexion tripolaire sur l'instru-
ment et les deux cosses du cable sur la douille de la
lampe.
12. Mettre en place l'instrument.
13. Raccorder la masse sur la batterie.
14. Contrdler le bon fonctionnement du manométre de
pression d’huile et l'absence de fuite d’huile prés du
capteur.
DEUTSCH
1. Die Masseleitung von der Batterie trennen.
2. Den Montagesatz auspacken.
3, Den Kabelstrang von dem gewahiten Instrumentenplatz
zur elektrischen Zentralanlage des Wagens verlegen.
SVENSKA
. Ta bort batteriets stomledning.
2. Packa upp satsen.
3. Dra ledningsnatet fran den valda platsen for instru-
mentet till bilens elcentral.
4. AnschluB 4, Inkoppling
Die Schnelistecker und Kabelschuhe des Montage- Anvand forgreningskontakterna och kabelskorna i satsen.
satzes verwenden.
Ledning 90/99 M79 (900 M7983 00 mae 9000 MBS: 9000 M86
Leitung 909979 900M79.83 900MB4- 9000M85 9000 M86: ba!
Fare Svat sortghet Jordghrt dorighet otourt potgeet
(escent = Velcertrl = ecentat Iicartrat (cert
indereeitr —agereletr mercer ndereiety ner eit? ant siekek ami) tang? Sag Sore?
(oe Gan Gave oe ee
Wet ‘Secherung 5. ‘Secherung 16 ‘Sacherung 12, ‘Secherarg 10 Secnerurg 10 1
— fro Soest Sora? a Sire secre eat
Pos 5
Braud = Sicherung 2 Schenng 13 ‘Sicherung 18 ‘Sicherurg 30 Rreostat
Wed (Grund (un) (Grunt oun) _—
Pos 5
(BraesWes
** Der Rheostat fur Instrumentenbeleuchtung in Saab
9000 M86- kann zusatzlich mit max. 5 W belastet
werden. Die Lampe des Olmanometers verbraucht
1,2W.
5. Die lange rote Leitung zum regularen Oldruckkontakt
beim Olfilter verlegen.
6. Den Oldruckkontakt herausschrauben.
7a. Gilt nur fiir Saab 99 M79-81
Den Winkel-Adapter einschrauben. Gewindedich-
tungsstreifen verwenden.
7b. Gilt nur fiir H-Motor (90, 99 M82-, 900 M81.,
9000)
WICHTIG! Genau kontrollieren, welcher Typ von
Oldruckkontakt
montiert ist.
Typ 1: Konisches Gewinde (1/4” — 18 NPTF) —
Den schmalen Adapter verwenden.
Typ 2: Zylindrisches Gewinde (M14 x 1,5) mit
Oberflachendichtung — den groBen
Adapter verwenden.
Den Adapter einschrauben, und zwar unter Ver-
wendung von:
Gewindedichtungsstreifen fur den konischen
Adapter.
Plandichtung fur den zylindrischen Adapter.
8. Den Oldruckgeber unter Verwendung von Gewinde-
dichtungsstreifen einschrauben.
9. Die rote Leitung abschneiden und mit einem Flach-
stecker an "G" am Geber anschlieBen. Die Leitung
mit Spannband befestigen.
10. Die blaue Leitung, die vorher am regularen Oldruck-
kontakt angeschlossen war, an "WK" am Geber
anschlieBen.
11. Das 3-polige Kontaktstiick an das Instrument und die
zwei Kabelschuhe an den Lampensockel anschlieBen
12. Das Instrument plazieren.
13. Die Masseleitung wieder an die Batterie anschlieBen.
14. Sich vergwessern, daB das Olmanometer funktioniert
und daB beim Geber kein Ol leckt
**Reostaten for instrumentbelysningen i Saab 9000 M86-
klarar ytterligare max 5 W belastning. Oljetrycksmatarens
tampa drar 1,2 W.
5. Dra den langa réda ledningen till den ordinarie olje-
tryckskontakten vid oljefiltret.
6. Skruva bort oljetryckskontakten.
7a. Endast Saab 99 M79-81
Skruva i den viklade adaptern, anvand gangtejp.
7b. Endast H-motor (90, 99 M82-, 900 M81-, 9000)
VIKTIGT! Kontrollera noga vilken typ av oljetrycks-
kontakt som ar monterad.
Typ 1: Konisk ganga (1/4”-18 NPTF) — Anvand den
smala adaptern.
Typ 2: Cylindrisk ganga (M14 x 1,5) med plantat-
ning — Anvand den grova adaptern.
Skruva i adaptern och anvand:
Gangtejp till den koniska adaptern,
Plantatning till den cylindriska adaptern.
8. Anvand gangtejp och skruva i oljetrycksgivaren.
9. Klipp av den roda ledningen och anslut den med ett
flatsift till "G" pa givaren.
Fast ledningen med spannband.
10. Anslut den bia ledningen, som tidigare satt pa den
ordinarie oljetryckskontakten, till "WK" pa givaren.
11. Anslut det 3-poliga kontaktstycket till instrumentet
och de tva kabelskorna till lampsockein.
12. Satt dit instrumentet.
13. Satt tillbaka batteriets stomledning.
14. Kontrollera att oljetrycksmataren fungerar och att det
inte finns nagot oljelackage vid givaren.
|? 9 cr a fb. WM Yee Ummm... BY
Page 3
Circuit diagram
Schéma de connexion
Schaltplan
Kopplingsschema
RD BL
G WK
Lighting
SV Eclairage
FUSE Beleuchtung
Fusible Belysning
Sicherung
Saknng
COLOUR CODES/TEINTES/FARBENCODES/FARGKODER
sv
GN
GL
VT
RD
BL
GR
BR
OR
VL
Black
Green
Yellow
White
Red
Blue
Grey
Brown
Orange
Purple
Noir
Vert
Jaune
Blanc
Rouge
Bleu
Gris
Brun
Orange
Violet
Schwarz
Grun
Gelb
Weib
Rot
Blau
Grau
Braun
Orange
Violett
Svart
Gron
Gul
Vit
Rod
Bla
Gra
Brun
Orange
Violett